React/ReactJS: Chat w/ Node.js & WebSocket
For implementing real-time applications like chat, live video streaming, online games, stock trading, etc, the traditional browser/server request/response methodology over HTTP protocol proves to be inefficient. You need a full-duplex client-server connection system.
For such purposes, we have the WebSocket API which gives persistent bi-directional TCP connection between a client (browser) and a server in real-time.
In this tutorial, we will create a simple chat application in React and Node.js using WebSocket.
Install ws, a WebSocket library in Node.js.
npm i ws
We now create a WebSocket server in Node.js as shown below. Include
ws, the above installed WebSocket library.
The port number we assign is 8080 (you can
pick any other number which does not conflict with your React
application port). We name this file
Server.js.
					const WebSocket = require('ws');

					const wss = new WebSocket.Server({ port: 8080 });

					wss.on('connection', function connection(ws) {
					  ws.on('message', function incoming(data) {
					    wss.clients.forEach(function each(client) {
					      if (client !== ws && client.readyState === WebSocket.OPEN) {
					        client.send(data);
					        // console.log('data', data);
					      }
					    });
					  });
					});
The client !== ws condition inside the
if statement is for the WebSocket on the
client side which broadcasts to every other connected WebSocket
clients, but excludes itself. You can uncomment the
// console.log('data', data); statement in
the above code to view the transmitted messages in real-time logged
into the console.
The client side code (React) goes inside a function component.
Just after the import statement(s), we
first define const URL and assign it the
'localhost' ip value where the protocol is
ws:// (and not the usual
http:// or
https://) and the port number is
8080, which is the very number assigned to
the server.
const URL = 'ws://127.0.0.1:8080';
We next create four states using the useState hook:
-
user, for storing the name/id of the user -
message, for assigning the latest message sent by a user -
messages, to store up all messages exchanged between clients -
ws, the instantiated WebSocket object. Note that this WebSocket is the WebSocket API and not the installedwslibrary used inServer.js.
					const [user, setUser] = useState('John');
					const [message, setMessage] = useState([]);
					const [messages, setMessages] = useState([]);
					const [ws, setWs] = useState(new WebSocket(URL));
Also, in our simplistic design of chat UI, a message (text) input box
and a submit button alongside it is generated via JSX, on press of
which a stringified message (along with the sender's name) is sent to
the server and at the same time appended to the
messages state array.
				  	const submitMessage = (usr, msg) => {
				  		const message = { user: usr, message: msg };
				  		ws.send(JSON.stringify(message));
				  		setMessages([message, ...messages]);
				  	}
All event handlers associated with the WebSocket goes inside the
useEffect()
hook. The returned function serves the purpose of
componentWillUnmount() in the function
component.
				  	useEffect(() => {
				  		ws.onopen = () => {
				  			console.log('WebSocket Connected');
				  		}

				  		ws.onmessage = (e) => {
				  		  const message = JSON.parse(e.data);
				  		  setMessages([message, ...messages]);
				  		}

				  		return () => {
				  			ws.onclose = () => {
				  				console.log('WebSocket Disconnected');
				  				setWs(new WebSocket(URL));
				  			}
				  		}
				  	}, [ws.onmessage, ws.onopen, ws.onclose, messages]);
We put it all together inside a function component as shown below.
					import React, { useState, useEffect } from "react";

					const URL = 'ws://127.0.0.1:8080';

					const Chat =() => {
						const [user, setUser] = useState('Tarzan');
					  	const [message, setMessage] = useState([]);
					  	const [messages, setMessages] = useState([]);
					  	const [ws, setWs] = useState(new WebSocket(URL));

					  	const submitMessage = (usr, msg) => {
					  		const message = { user: usr, message: msg };
					  		ws.send(JSON.stringify(message));
					  		setMessages([message, ...messages]);
					  	}

					  	useEffect(() => {
						    ws.onopen = () => {
						      console.log('WebSocket Connected');
						    }

						    ws.onmessage = (e) => {
						      const message = JSON.parse(e.data);
						      setMessages([message, ...messages]);
						    }

						    return () => {
						      ws.onclose = () => {
						        console.log('WebSocket Disconnected');
						        setWs(new WebSocket(URL));
						      }
						    }
					  	}, [ws.onmessage, ws.onopen, ws.onclose, messages]);

					  	return (
						    <div>
						        <label htmlFor="user">
						          Name :
						          <input
						            type="text"
						            id="user"
						            placeholder="User"
						            value={user}
						            onChange={e => setUser(e.target.value)}
						          />
						        </label>

						        <ul>
						          {messages.reverse().map((message, index) =>
						            <li key={index}>
						              <b>{message.user}</b>: <em>{message.message}</em>
						            </li>
						          )}
						        </ul>

						        <form
						          action=""
						          onSubmit={e => {
						            e.preventDefault();
						            submitMessage(user, message);
						            setMessage([]);
						          }}
						        >
						          <input
						            type="text"
						            placeholder={'Type a message ...'}
						            value={message}
						            onChange={e => setMessage(e.target.value)}
						          />
						          <input type="submit" value={'Send'} />
						        </form>
						    </div>
					  	)
					}

					export default Chat;
We add minimal CSS to align the
<ul/>'s' and the
<li/>'s and designate some height to
the messages area.
					ul {
						height: 150px;
						padding-inline-start: 0px;
					}

					ul > li {
						list-style-type: none;
					}
and import it into the React file.
import './Chat.css';
Now, navigate to the location of the WebSocket server file
Server.js and start the chat.
node Server.js
Start the React application.
npm start
You can open two browser windows, fill the
Name fields with two different names
(Tarzan and
Jane here) and start the chat.
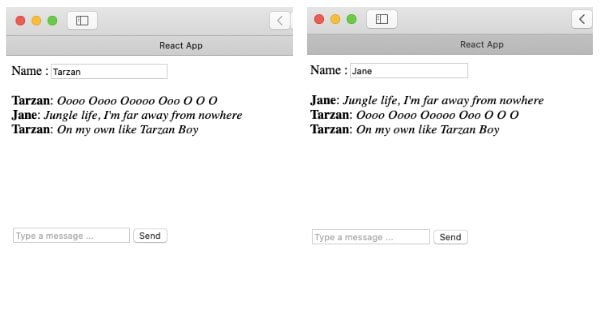
You can proceed on your own from here: improve the UI, add timestamps to messages, display profile pictures, create databases for chat history, etc.
Notes
-
The WebSocket implemented on the client side is the
WebSocket API, not the installed
ws.