React/ReactJS: Props and State
Although we already have covered props in our previous tutorial, we will recap it a bit here before starting on state in ReactJS.
Props (Revisited)

We bring the <Hello/> component
from our previous post on
components and props.
					class Hello extends React.Component {
					  render() {
					    return <h1>Hello, {this.props.name}!</h1>;
					  }
					}

					ReactDOM.render(<Hello name="Agnes"/>, document.getElementById('root'));
As you might have noticed, the property
name (shortly called "props") with the
value "Agnes" is passed into the
<Hello/> component. Say we want to
do some drastic manipulation on the property, like giving it some
other value before the program executes the return statement inside
the component. We try assigning an alternate value "Anastasia" to it
just before the render() method.
					class Hello extends React.Component {
					  this.props.name = 'Anastasia';
					  render() {
					    return <h1>Hello, {this.props.name}!</h1>;
					  }
					}

					ReactDOM.render(<Hello name="Agnes"/>, document.getElementById('root'));
Well, it does not work and throws an error. The props
name with value "Agnes" cannot be
reassigned or changed. Which means props are immutable
("unchangeable") or read-only.
The Need for State in ReactJS
Next we do a minor revamp on the above
<Hello/> component by modifying it
a little to accept an input text and display it. The first thing we
need is an <input/> element for
entering a text.
				import React, { Component } from 'react';

				class Hello extends Component {
				  constructor(props) {
				    super(props);
				  }

				  render() {
				    return (
				      <div>
				        <label>
				        	<input type="text"/>
				        </label>
				      </div>
				    );
				  }
				}

				export default Hello;
We will create a variable to hold this text value and illustrate its
uselessness for our purpose. We call this variable
name and define it inside the
constructor() method. Initially it is
assigned an empty string.
				import React, { Component } from 'react';

				class Hello extends Component {
				  constructor(props) {
				    super(props);
				    this.name = '';
				  }

				  render() {
				    return (
				      <div>
				      	<label>
				        	<input type="text"/>
				        </label>
				      </div>
				    );
				  }
				}

				export default Hello;
To get the input text, we assign a handler called
getName() to the
onChange event. Notice that unlike in
regular HTML, the onChange event is
written in camelCase instead of the lowercase. All other events are
also written in camelCase like onClick,
onMouseEnter,
onMouseUp, etc. The
e you see passed as an argument to
getName() is a synthetic event. You can
read about them
here.
					import React, { Component } from 'react';

					class Hello extends Component {
					  constructor(props) {
					    super(props);
					    this.name = '';
					  }

					  getName(e) {
					    this.name = e.target.value;
					  }

					  render() {
					    return (
					      <div>
					      	<label>
					        	<input type="text" onChange={(e) => this.getName(e)}/>
					        </label>
					      </div>
					    );
					  }
					}

					export default Hello;
We can think of displaying this typed name somewhere in the
document. Append another element below
<label>, say
<p>, which has a
<span> element as its child. The
value of the input text is intended to be displayed inside it. The
variable name inside the
getName() method gets updated everytime
some text is typed into the input; but the thing is, how do we
display this updated value inside the
<span> element in the document? We
cannot directly place something like
this.name or
{this.name} inside the
<span> element and hope for an
update everytime some text is typed. It just will not happen. So for
now, in order to achieve that, we have to resort to good old
JavaScript (or jQuery) as we directly manipulate the real DOM to
replace the inside of the
<span> element. Here we do not see
much sense in using ReactJs at all; it seems more like doing things
in a round-about manner.
					import React, { Component } from 'react';

					class Hello extends Component {
					  constructor(props) {
					    super(props);
					    this.name = '';
					  }

					  getName(e) {
					    this.name = e.target.value;
					    document.querySelector('div p span').innerHTML
					    	= this.name;
					  }

					  render() {
					    return (
					      <div>
					      	<label>
					        	<input type="text" onChange={(e) => this.getName(e)}/>
					        </label>
					        <p>
					          Hello, <span></span>!
					        </p>
					      </div>
					    );
					  }
					}

					export default Hello;
It still would have been nice if we can place something like
this.name or
{this.name} inside the
<span> element and get updated
values everytime there is a change. This is where the role of
state comes in, a mutable ("changeable") object
capable of auto-updating on change. Each class component has this
extra object whose scope is limited to the current component.
To initialize a state variable, we do not assign some value directly
to this.state.name as we do to any other
JavaScript variable — either we use
this.state = {..} inside the constructor
or just state = {..} outside of it,
alongside any other method. And when we update, we use the
this.setState() method. See it inside
the getName() method below.
					import React, { Component } from 'react';

					class Hello extends Component {
					  constructor(props) {
					    super(props);
					    this.state = {
					    	name: ''
					    };
					  }

					  getName(e) {
					  	this.setState({
					    	name: e.target.value
					  	});
					  }

					  render() {
					    return (
					      <div>
					      	<label>
					        	<input type="text" onChange={(e) => this.getName(e)}/>
					        </label>
					        <p>
					          Hello, <span>{this.state.name}</span>!
					        </p>
					      </div>
					    );
					  }
					}

					export default Hello;
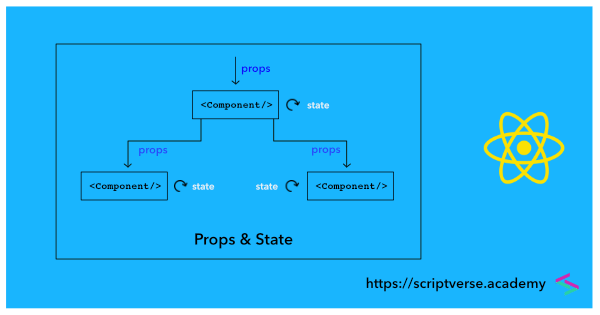 ReactJS: Props v/s State
Changing State of Parent Component from a Child Component
Now let us take the
<input/> element out of the
<Hello/> component and create
another component around it. We call it the
<Name/> component and save it as
name.js. The
getName() method also follows and will
be modified a bit later.
						import React, { Component } from 'react';

						class Name extends Component {
						  constructor(props) {
						    super(props);
						  }

						  getName(e) {
						    // update state of parent component
						  }

						  render() {
						    return (
						      <label>
						         <input type="text" onChange={(e) => this.getName(e)}/>
						      </label>
						    );
						  }
						}

						export default Name;
Now in the <Hello/> component, we
define a new method called
updateName() to update the state
variable name. We then bind it inside
the constructor() method. The
<Name/> component replaces the
previous <input/> element, and it
will be rendered there. The
<Name/> component now becomes a
child component of the
<Hello/> component. Two JSX
attributes (props to be exact) are
passed to it — parentState,
holding the state object, and
updateName, holding the
updateName() method.
						import React, { Component } from 'react';
						import Name from './name';

						class Hello extends Component {
						  constructor(props) {
						    super(props);
						    this.state = {
						    	name: ''
						    };
						    this.updateName = this.updateName.bind(this);
						  }

						  updateName(name) {
						  	this.setState({
						  		name: name
						  	});
						  }

						  render() {
						    return (
						      <div>
						      	<Name parentState={this.state} updateName={this.updateName}/>
						        <p>
						          Hello, <span>{this.state.name}</span>!
						        </p>
						      </div>
						    );
						  }
						}

						export default Hello;
Note carefully that we have just passed the state object of the
<Hello/> component into the child
component <Name/>, where it will
be available as props. To rephrase it again, the state object of a
parent component is passed as props to a child component. All the
props passed to a child component from its parent can be accessed by
using this.props. You want to access the
state variable name in the parent
component? Since the state is passed as
parentState props, use
this.props.parentState.name to access
it. A console.log() of
this.props inside
render() will clear things up.
						  render() {
						    console.log('this.props', this.props);
						    return (
						      <label>
						         <input type="text" onChange={(e) => this.getName(e)}/>
						      </label>
						    );
						  }
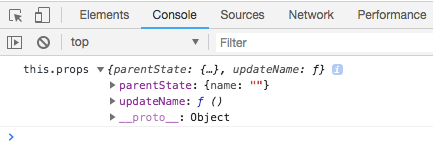 State object pased as props to a child component
Now we are aware of the fact that props are immutable. But there is
a way to update/change a state variable in the parent component from
its child. Which means, we can update/change the
<Hello/> component's state
variable name from the
<Name/> component. The method for
updating it is passed as
updateName props. We access it using
this.props and just pass the required
argument. See how it is done below.
						import React, { Component } from 'react';

						class Name extends Component {
						  constructor(props) {
						    super(props);
						  }

						  getName(e) {
						    this.props.updateName(e.target.value);
						  }

						  render() {
						    return (
						      <label>
						         <input type="text" onChange={(e) => this.getName(e)}/>
						      </label>
						    );
						  }
						}

						export default Name;
The "Hello" text along with the element wrapping it are all in the
parent component. For whatever text is being typed into the input
box in the <Next/> component, the
state variable name in the parent
component <Hello/> gets updated.