React/ReactJS: Dynamic Select/Option
In the first section of this tutorial, you will learn how to add options dynamically to a select/option dropdown in React/ReactJS with array values and with object literal properties.
And in the second section, you will learn how to access custom
data- attributes of a selected element in
a select/option dropdown.

We will proceed with examples.
Dynamic Dropdown
Create two state variables countries and
colours to store the details of few
countries and colours as an array and an object respectively. Inside
the constructor(), initialize the
countries state variable to an empty
array [] and the
colours variable to an empty object
{}.
						constructor(props) {
							super(props);
							this.state = {
								countries: [],
								colours: {}
							};
						}
Array
The countries state variable is an
array, and its elements are assigned inside the
componentDidMount() lifecycle method. If
you have an API, you can call it and do the assignments of the
response data here.
						componentDidMount() {
							this.setState({
								countries: [
									{id: 'AFG', name: 'Afghanistan'},
									{id: 'ALA', name: 'Aland Islands'},
									{id: 'ALB', name: 'Albania'}
								]
							});
						}
Now inside the render() method, we make
use of the
Array.map()
method, which calls the callback function once for each element and
returns a newly constructed array from the results.
						render() {
							const { countries } = this.state;

							let countriesList = countries.length > 0
								&& countries.map((item, i) => {
								return (
									<option key={i} value={item.id}>{item.name}</option>
								)
							}, this);

							return (
								<div>
									<select>
										{countriesList}
									</select>
								</div>
							);

						}
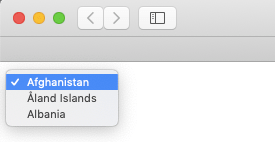
Here is the complete component.
						import React, { Component } from 'react';

						class Countries extends React.Component {
						  constructor(props) {
						    super(props);
						    this.state = {
						      countries: [],
						      colours: {}
						    };
						  }

						  componentDidMount() {
						    this.setState({
						      countries: [
						        {id: 'AFG', name: 'Afghanistan'},
						        {id: 'ALA', name: 'Åland Islands'},
						        {id: 'ALB', name: 'Albania'}
						      ]
						    });
						  }


						  render () {
						    const { countries } = this.state;

						    let countriesList = countries.length > 0
						    	&& countries.map((item, i) => {
						      return (
						        <option key={i} value={item.id}>{item.name}</option>
						      )
						    }, this);

						    return (
						      <div>
						        <select>
						          {countriesList}
						        </select>
						      </div>
						    );
						  }
						}

						export default Countries;
Literal Object
Just like the countries state variable
in the above section, the colours state
variable (which is an object) is also assigned the key-value pairs
inside the componentDidMount() method.
						componentDidMount() {
							this.setState({
								colours: {
									"#ff0000": "Red",
									"#00ff00": "Green",
									"#0000ff": "Blue"
								}
							});
						}
Inside render(), we first make use of
the
Object.keys()
method to obtain the keys of the
colours object as an array.
So, Object.keys(colours) will return the
array ["#ff0000", "#00ff00", "#0000ff"].
Now on this newly formed array, we apply the
map() method and return the
<option/> elements as we did
above.
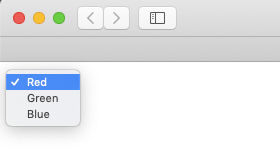
						render() {
							const { colours } = this.state;

							let coloursList = Object.keys(colours).map((k) => {
								return (
									<option key={k} value={k}>{colours[k]}</option>
								)
							}, this);

							return (
								<div>
									<select>
										{coloursList}
									</select>
								</div>
							);
						}
Access/Get Custom data- Attribute Values
Accessing the data- attributes of an
element belong to the realm of Vanilla JavaScript. For the sake of
simplicity, here we will consider static select/option dropdowns.
In a typical select/option dropdown, the usual required value to be
sent when an option is selected is set to the
value attribute. For example, in a
typical country list dropdown, you might have set the option values
to respective ISO 3166 codes as shown below
					      <select>
					        <option value="AFG">Afghanistan</option>
					        <option value="ALA">Aland Islands</option>
					        <option value="ALB">Albania</option>
					      </select>
But often we need to pass along additional information besides the usual value. For example, in the above case, you might need to pass along the ISD code too. Take another example. Consider a dropdown list of movies. You might have set the values to movie names but at the same time need to pass along the release year. There are many such cases we come across when we develop an application.
Such additional data are best stored by
custom data attributes. An HTML element can have any number of custom attributes with any
value. Their name starts with data-,
followed by at least one character after the hyphen which is/are not
uppercased. For example, in a typical country list dropdown (as in
the example above), if you have set the values to respective ISO
3166 code, you can store their ISD codes in a custom attribute like
data-isd.
					      <select>
					        <option data-isd="+93" value="AFG">Afghanistan</option>
					        <option data-isd="+358" value="ALA">Aland Islands</option>
					        <option data-isd="+355" value="ALB">Albania</option>
					      </select>
In a dropdown list of movies, if you have set the values to movie
names, their respective release years can be stored in a custom data
attribute like data-year.
					      <select>
					        <option data-year="2009" value="District 9">District 9</option>
					        <option data-year="2010" value="Predators">Predators</option>
					        <option data-year="2002" value="Star Trek: Nemesis">Star Trek: Nemesis</option>
					      </select>
Now that we have assigned the custom data attributes, how do we
access them? Via the
dataset
property available on the
HTMLElement
interface. This is what you will learn in the first part of this
tutorial: how to fetch custom
data- attributes set in the
<option/> elements in
React/ReactJS.
We pick the dropdown list of our first example, the country dropdown
list. We assign a handler called
selectCountry() to the
onChange event in the
<select/> element.
					      <select onChange={this.selectCountry}>
					        <option data-isd="+93" value="AFG">Afghanistan</option>
					        <option data-isd="+358" value="ALA">Aland Islands</option>
					        <option data-isd="+355" value="ALB">Albania</option>
					      </select>
We define selectCountry() as a method
inside the class constructor.
						constructor(props) {
							super(props);
							this.selectCountry = this.selectCountry.bind(this);
						}
Now here is the most important part. The custom
data-isd attribute we stored on the
<option/> elements may be accessed
via its dataset property as shown below.
Note carefully the last line. The
data-isd attribute is accessed as
dataset.isd.
					  	selectCountry = (e) => {
					  		let idx = e.target.selectedIndex;
					  		let dataset = e.target.options[idx].dataset;
					  		console.log('ISD Code: ', dataset.isd);
					  	}
On select of Albania, the above
selectCountry() method logs in the
browser's console the value stored in the custom
data-isd attribute.